
Connecting the Dots: Creating a plugin in Outerbase
This article is about creating a custom plugin that handles drag/drop events to trigger an upload to Cloudinary and then updating the database.


Table of contents
- Purpose of the code
- Why did I choose to create this plugin?
- Problems faced while creating this plugin
- What is DOM?
- Clarification of Concepts
- Brief on the code
- Detail Analysis of the code
- Creating the Template for the Custom Element
- Plugin Configuration Class
- Implementing the Custom Element
- Defining the OuterbasePluginCell_$PLUGIN_ID Class and Its Observed Attributes
- Initializing the Configuration
- Constructor Implementation
- Implementing the Upload logic
- Dispatching Value Change Events
- Registering the Custom Element
- Installing it in Outerbase
NOTE: Outerbase is in beta, so things are subject to change. But with the help of the plugin, I was able to directly change the Cloudinary URL of an image and then update the database with the new link on September 12, 2023.
Outerbase is a modern, cloud-based database interface that enhances teamwork and efficiency. It features EZQL, a natural language to SQL agent for easy data queries, and allows real-time collaboration, workflow automation, and data visualization. It's suitable for developers for simplified database management, product teams for direct data access, and businesses for a comprehensive database view and cost reduction.
Cloudinary is a Software-as-a-Service (SaaS) solution that provides cloud-based image and video management services. It allows you to upload, store, manage, manipulate, and deliver images and videos for websites and apps.
Purpose of the code
The main purpose of this code is to allow uploading images directly from within Outerbase cells to Cloudinary image hosting and sync the changes back to the connected database.
Some key goals it achieves are:
Allows users to easily upload images without leaving Outerbase, by just dragging and dropping into a cell.
Automatically uploads the images to Cloudinary, handling the upload process.
Updates the cell value to the new Cloudinary URL, so the cell shows the hosted image.
Syncs the change back to the Outerbase database by fetching the old image ID and sending a PATCH request to update the image source.
So in summary, it provides a seamless image upload experience from within Outerbase, offloading the image hosting to Cloudinary, while keeping the database data up-to-date with the changes.
Why did I choose to create this plugin?
I have been integrating Cloudinary with the applications I build for quite some time now. The normal process has always been very tedious and now, with the help of this plugin users can upload images directly into table cells via a custom drag-and-drop interface, providing a seamless and intuitive way to manage images within Outerbase’s tables.
The development of this plugin was driven by the ambition to enhance user engagement, simplify image management, and broaden the functionality of Outerbase. It stands as a powerful example of how custom elements can significantly improve the capabilities of Outerbase and the overall experience for web developers.
Problems faced while creating this plugin
It would be a lie to say that the process has been smooth as butter. In fact, one of the main challenges I encountered while creating this plugin was related to updating the cell value in the database. Initially, I was able to update the cell value in the Shadow DOM, but these changes were not reflected in the database. This was a significant hurdle, as it prevented the plugin from functioning as intended.
At first, my understanding of the DOM was not very clear, and I assumed that any change in the cell value would automatically update the database. However, this was not the case. It was a moment of realization that led me to dig deeper and connect the dots.
With determination and a better understanding of how Outerbase works, it finally clicked on my mind that I could use commands that Outerbase offers, to update the database. Implementing these commands was like connecting the dots - it bridged the gap between my initial understanding and the actual functionality of Outerbase.
In essence, creating this plugin has been a journey of connecting the dots - from understanding the DOM to implementing Outerbase commands, each step brought me closer to my goal. Despite the challenges, this experience served as a valuable learning opportunity and ultimately contributed to the successful creation of the plugin.
What is DOM?
The Document Object Model (DOM) is a programming interface for web documents. It represents the page so that programs can change the document structure, style, and content. The DOM represents the document as nodes and objects, allowing programming languages to interact with the page.
Clarification of Concepts
templateCell_$PLUGIN_ID
The templateCell_$PLUGIN_ID variable in the code is a template literal that holds the HTML structure and CSS styles for a new custom HTML element. This template is created using the document.createElement("template") method, which creates a new <template> element in the DOM.
The innerHTML property of this template is then set to a string containing the HTML and CSS for the custom element. This includes a container div with an input field, along with CSS styles to define the appearance and layout of these elements.
So in summary, the templateCell_$PLUGIN_ID defines the reusable markup and styling for the cell view of the plugin. This allows the plugin to render customized UI embedded inside the Outerbase cell.
The template approach allows the plugin to define its own DOM, CSS and behaviors isolated from the main Outerbase page.
When the cell element is created, it clones this template into the shadow DOM to construct the actual cell UI. So the template acts as a blueprint for the cell implementation.
OuterbasePluginConfig_$PLUGIN_ID
The OuterbasePluginConfig_$PLUGIN_ID class in the code is a constructor function that is used to create and initialize objects for the plugin’s configuration.
OuterbasePluginCell_$PLUGIN_ID
The OuterbasePluginCell_$PLUGIN_ID class defines the cell view implementation for the Outerbase plugin.
Brief on the code
This Outerbase plugin allows uploading images directly into table cells through a custom drag-and-drop interface. It is implemented as a custom element that extends Outerbase's plugin cell class.
The key components include a template for the plugin's UI defined in templateCell, the plugin class OuterbasePluginCell, and the main custom element implementation. This handles initializing the cell, attaching event listeners for dragging files over the cell, and invoking the uploadToCloudinary method when a file is dropped.
The upload logic handles sending the image to Cloudinary via their API and returns a secure URL that is used to update the cell's value. It also fetches the original image ID and sends a request to update the image source in the database.
Overall, the architecture of the code provides a way to seamlessly integrate Cloudinary's image CDN with Outerbase's tables through a custom interface embedded right in the cells.
Detail Analysis of the code
In the upcoming section, I will be adopting a structured approach: each point will be presented with a heading, followed by the relevant code, and then an analysis of that code.
Creating the Template for the Custom Element
var templateCell_$PLUGIN_ID = document.createElement("template");
templateCell_$PLUGIN_ID.innerHTML = `
  <style>
    #container {
      display: flex;
      align-items: center;
      gap: 8px;
      justify-content: space-between;
      height: 100%;
      width: calc(100% - 16px);
      padding: 0 8px;
    }
    input {
      height: 100%;
      flex: 1;
      background-color: transparent;
      border: 0;
      min-width: 0;
      white-space: nowrap;
      text-overflow: ellipsis;
      overflow: hidden;
    }
    input:focus {
      outline: none;
    }
  </style>
  <div id="container">
    <input type="text" id="content-value" placeholder="Drop an image here...">
  </div>
`;
This code defines the template for the plugin's cell UI. It starts by creating a <template> element to hold the template, stored in templateCell_$PLUGIN_ID. This is done using the document.createElement("template") method.
The innerHTML property of the template is set to a string that includes both the HTML structure and CSS styles for the custom element. The code creates a div container with an input field that can be used to drop an image. The container is styled using CSS to make it look nice and to ensure that the input field is displayed correctly.
Overall, this template defines the basic structure and appearance of the cell with the drag-and-drop interface. The template element allows reusing this DOM structure efficiently.
Plugin Configuration Class
class OuterbasePluginConfig_$PLUGIN_ID {
  constructor(object) {}
}
This defines the OuterbasePluginConfig_$PLUGIN_ID class with an empty constructor with an object parameter. This class could be used to handle various configuration options, such as API keys, user preferences, or other settings.
The class is empty for now, it provides a placeholder for adding more advanced configuration handling in the future.
Overall, this sets up the ability to configure the plugin when used in Outerbase, following their plugin system conventions. The config instance gets passed to the main custom element class.
Implementing the Custom Element
class OuterbasePluginCell_$PLUGIN_ID extends HTMLElement {
  static get observedAttributes() {
    return ["cellValue", "configuration"];
  }

  config = new OuterbasePluginConfig_$PLUGIN_ID({});

  constructor() {
    super();
    this.shadow = this.attachShadow({ mode: "open" });
    this.shadow.appendChild(templateCell_$PLUGIN_ID.content.cloneNode(true));
  }

  connectedCallback() {
    this.config = new OuterbasePluginConfig_$PLUGIN_ID(
      JSON.parse(this.getAttribute("configuration"))
    );
    var cellValue = this.getAttribute("cellValue");
    this.shadow.querySelector("#content-value").value = cellValue;

    var container = this.shadow.getElementById("container");

    if (container) {
      container.addEventListener("dragover", (event) => {
        event.preventDefault();
      });

      container.addEventListener("drop", (event) => {
        event.preventDefault();
        var file = event.dataTransfer.files[0];
        this.uploadToCloudinary(file);
      });
    }
  }

  uploadToCloudinary(file) {
    // Store the old URL before uploading to Cloudinary
    const oldUrl = this.getAttribute("cellValue");

    // Replace these values with your own Cloudinary credentials
    var cloudName = "YOUR_CLOUDINARY_CLOUD_NAME";
    var uploadPreset = "YOUR_CLOUDINARY_UPLOAD_PRESET";

    // Create a new FormData object to hold the file to upload
    var formData = new FormData();
    formData.append("file", file);
    formData.append("upload_preset", uploadPreset);

    let secureUrl;

    // Call the Cloudinary API to upload the file
    fetch(`https://api.cloudinary.com/v1_1/${cloudName}/image/upload`, {
      method: "POST",
      body: formData,
    })
      .then((response) => response.json())
      .then((data) => {
        // Update the cell with the Cloudinary URL
        this.callCustomEvent({
          action: "cellvalue",
          value: data.secure_url,
        });

        // Assign the secure_url to secureUrl
        secureUrl = data.secure_url;

        // Fetch the id using the old URL
        return fetch(
          `GET_COMMAND_LINK_TO_GET_ID`,
          {
            method: "GET",
            headers: {
              "content-type": "application/json",
            },
          }
        );
      })
      .then((response) => response.json())
      .then((data) => {
        if (data.success && data.response.items.length > 0) {
          const id = data.response.items[0].id;
          // Send a PATCH request to change the image with the plugin using the id from the above command
          fetch(
            "COMMAND_LINK_FOR_PATCH",
            {
              method: "PUT",
              headers: {
                "content-type": "application/json",
              },
              body: JSON.stringify({
                id: id.toString(),
                image: secureUrl,
              }),
            }
          );
        }
      });
  }

  callCustomEvent(data) {
    const event = new CustomEvent("custom-change", {
      detail: data,
      bubbles: true,
      composed: true,
    });

    this.dispatchEvent(event);
  }
}
Since this part is long I will break it down below in the same format.
Defining the OuterbasePluginCell_$PLUGIN_ID Class and Its Observed Attributes
class OuterbasePluginCell_$PLUGIN_ID extends HTMLElement {
  static get observedAttributes() {
    return ["cellValue", "configuration"];
  }
The OuterbasePluginCell_$PLUGIN_ID class is a custom HTML element that extends the HTMLElement class. This class is used to create and manage instances of the custom element.
The observedAttributes static method declares the attributes that will be watched for changes - "cellValue" and "configuration". Any changes to these attributes will trigger the attributeChangedCallback.
In summary, this part of the code defines the custom element and specifies which of its attributes should be monitored for changes.
For this code, I have hardcoded the secret Cloudinary values but in my roadmap, there is a plan to make it dynamic so users can just upload those values and not have to touch the code.
Initializing the Configuration
config = new OuterbasePluginConfig_$PLUGIN_ID({});
This creates an empty instance of the OuterbasePluginConfig class defined earlier. It will store the parsed plugin configuration.
Constructor Implementation
constructor() {
  super();
  this.shadow = this.attachShadow({ mode: "open" });
  this.shadow.appendChild(templateCell_$PLUGIN_ID.content.cloneNode(true));
}
The constructor first calls the HTMLElement parent constructor with super(). This is necessary in order to use the this keyword within our class.
It then attaches a shadow DOM root using attachShadow(). A shadow root is a document fragment that gets attached to a “host” element, but it forms a separate rendering tree and doesn’t affect the main document’s tree. The { mode: "open" } options make the shadow DOM accessible from JavaScript outside the component.
Next, it clones the templateCell template content into the shadow DOM using cloneNode(true). The cloneNode(true) method creates a deep copy of the node, meaning it also includes all the node’s descendants.
Overall, the constructor sets up the initial plugin's internal state - the configuration object, shadow DOM root, and cloned template content.
Implementing the Upload logic
 uploadToCloudinary(file) {
    // Store the old URL before uploading to Cloudinary
    const oldUrl = this.getAttribute("cellValue");

    // Replace these values with your own Cloudinary credentials
    var cloudName = "YOUR_CLOUDINARY_CLOUD_NAME";
    var uploadPreset = "YOUR_CLOUDINARY_UPLOAD_PRESET";

    // Create a new FormData object to hold the file to upload
    var formData = new FormData();
    formData.append("file", file);
    formData.append("upload_preset", uploadPreset);

    let secureUrl;

    // Call the Cloudinary API to upload the file
    fetch(`https://api.cloudinary.com/v1_1/${cloudName}/image/upload`, {
      method: "POST",
      body: formData,
    })
      .then((response) => response.json())
      .then((data) => {
        // Update the cell with the Cloudinary URL
        this.callCustomEvent({
          action: "cellvalue",
          value: data.secure_url,
        });

        // Assign the secure_url to secureUrl
        secureUrl = data.secure_url;

        // Fetch the id using the old URL
        return fetch(
          `GET_COMMAND_LINK_TO_GET_ID`,
          {
            method: "GET",
            headers: {
              "content-type": "application/json",
            },
          }
        );
      })
      .then((response) => response.json())
      .then((data) => {
        if (data.success && data.response.items.length > 0) {
          const id = data.response.items[0].id;
          // Send a PATCH request to change the image with the plugin using the id from the above command
          fetch(
            "COMMAND_LINK_FOR_PATCH",
            {
              method: "PUT",
              headers: {
                "content-type": "application/json",
              },
              body: JSON.stringify({
                id: id.toString(),
                image: secureUrl,
              }),
            }
          );
        }
      });
  }
This method handles uploading the dropped file to Cloudinary and updating the database with the new link.
Storing the old URL: The method begins by storing the old URL of the image before uploading to Cloudinary. This is done using
this.getAttribute("cellValue"), which gets the current value of thecellValueattribute. We are storing the old url since it will be use to do a GET request to fetch the id.Setting up Cloudinary credentials: The Cloudinary credentials, including
cloudNameanduploadPreset, are defined. These would typically be replaced with your own Cloudinary credentials.Creating a FormData object: A new FormData object is created and the file to be uploaded is appended to it along with the
uploadPreset.Calling the Cloudinary API: The Fetch API is used to send a POST request to the Cloudinary upload endpoint with the FormData object as the body.
Updating the cell with the Cloudinary URL: Once the upload is successful, the
callCustomEventmethod is called to update the cell value with the secure URL returned from Cloudinary.Fetching the old image ID: A GET request is made to fetch the ID of the old image using its URL.
Updating the database: If the old image ID is successfully fetched, a PUT request is sent to update the image source in Outerbase with the new secure URL.
In summary, this method coordinates the core plugin functionality to enable direct Cloudinary integration in the Outerbase cell.
Dispatching Value Change Events
callCustomEvent(data) {
    const event = new CustomEvent("custom-change", {
      detail: data,
      bubbles: true,
      composed: true,
    });

    this.dispatchEvent(event);
  }
}
This method dispatches a custom "custom-change" event to notify Outerbase when the cell value changes.
Creating a new CustomEvent: The CustomEvent constructor is used to create a new custom event. The first argument is the event type, in this case, “custom-change”. The second argument is an options object that includes:
detail: This property contains the data that will be passed with the event. In this case, it’s thedataparameter passed into thecallCustomEventmethod.bubbles: This property is set totrue, which means the event will bubble up through the DOM tree.composed: This property is also set totrue, which means the event will cross shadow DOM boundaries.
Dispatching the event: The dispatchEvent method is called on this (the custom element) to dispatch the event. This triggers any event listeners that are listening for the “custom-change” event.
In summary, this method allows the custom element to send data to other parts of the application by dispatching a custom event.
Registering the Custom Element
window.customElements.define(
  "outerbase-plugin-cell-$PLUGIN_ID",
  OuterbasePluginCell_$PLUGIN_ID
);
This code registers the new custom element definition with the browser.
It uses customElements.define() method to define the element name outerbase-plugin-cell-$PLUGIN_ID and connect it to the OuterbasePluginCell_$PLUGIN_ID class.
Defining the custom element is the last step that makes the component reusable. Now the upload plugin can be embedded directly in Outerbase table cells.
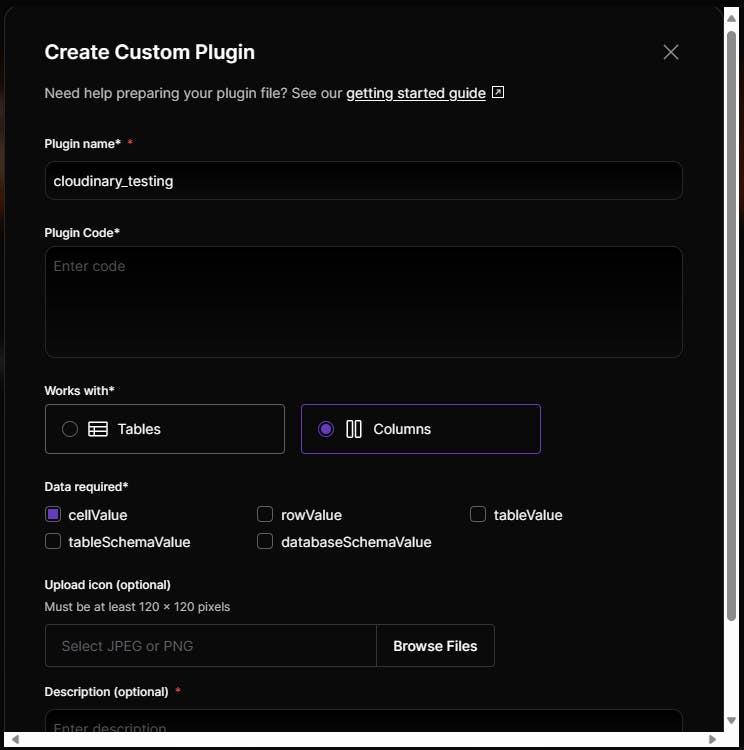
Installing it in Outerbase
Click on the puzzle icon on the left sidebar.
Click on the custom plugin
A form will appear, provide your desired name --> paste the whole code in "Plugin Code" --> Choose "Columns" --> Choose "callValue" --> Click on "Create Plugin"
Go to your db table --> Click on 'v' in the title of the column a dropdown should appear --> Choose the plugin (In my case I named it "image-upload-fetchid"

- If your commands are correctly working and your Cloudinary secret values are correct you should be able to just drop a picture in a cell and the plugin will do the magic.
Github Repo: trace2798/outerbase-plugins (github.com)
I hope this article helps you. If you have any questions, feel free to leave a comment, and I will respond to them as soon as possible.
Happy Hacking !!!