
Share and Review books you love with "Summize"
This article covers how this application is made using Outerbase.


Table of contents
- What is Summize?
- How to use Summize?
- Why did I choose this project?
- What is Outerbase?
- What is the tech stack used?
- Did I face any challenges while building the app?
- Use of Outerbase
- Creating Summize
- Creating Outerbase Command
- Semantic Search with AI
- Settings Route
- Stripe integration
- List of all the Commands
- Queries for Database Analysis
- Demo Credentials
NOTE: Outerbase is in beta, so things are subject to change. The article will cover the process I took to create the application in September 2023.
Summize is a web application where you can add books you love and also add your reviews/summaries. For this application, I have used commands and queries from Outerbase. For generating those commands and queries, EZQL has been of great help.
I would like to express my sincere gratitude to Hashnode and Outerbase for providing this incredible opportunity. Participating in this event has been an enriching learning experience and a true privilege.
What is Summize?
Summize is an application where my journey for this Outerbase Hashnode hackathon started. In this application, you can add books you love and also add summaries and reviews of books others have uploaded. Also, you can chat with summize AI about the data you have uploaded, and it also uses semantic search to search for books. Login is required to use AI implementation parts.
How to use Summize?
Once the application is running in your local environment, in the section called "Setting Up the Summize App in Your Local Environment: A Step-by-Step Guide" I have explained in detail how you can set it up in your local environment or if you visit the deployed link.
You should be greeted with a home page. On the home page, you will have the option to log in or register. But to just browse the application, you do not need an account.
On the home page, you can click on "Discover Books" to check all the books, and if you click on any book, you can check the provided info about the book and also any reviews/summaries by others if provided.
Once you are on the "/book" route you should see a sidebar on the left. It has all the different routes available in the application.
To add a post, summary/review, or to use the AI feature sign-in is required.
Why did I choose this project?
I was inspired to create Summize for the Outerbase X Hashnode Hackathon because I saw this application as a great source to learn about Outerbase and its functionality and with the aspiration that the end result of this application will assist at least a few individuals in discovering a new book or sharing their thoughts on a book they’ve previously read.
As I previously mentioned, my journey for this hackathon began with this application. Initially, Outerbase was a service I had never used before, and I was uncertain about how to utilize it. Based on my understanding, I connected my Postgres database to Outerbase, creating my first base. I then explored Outerbase Commands and, upon completing this application, I can confidently say that I now have a better understanding of Outerbase and its benefits for developers. For this application, I utilized Outerbase Commands as extensively as currently possible.
Throughout this experimental journey with Outerbase, I managed to integrate Resend, Discord, the OpenAI embedding endpoint, multiple Pinecone endpoints, and Leap AI endpoints. Additionally, I successfully created a custom plugin that handles drag/drop events to trigger an upload to Cloudinary and subsequently update the database. Apart from Commands, one feature of Outerbase that I love is how easy it is to create graphs (I personally have to create graphs and try to avoid it as much as possible) with the data from the connected database. Overall, this has been an enriching experience and I am very confident that I will be using Outerbase in the future.
What is Outerbase?
Outerbase is a modern, cloud-based database interface that enhances teamwork and efficiency.
It features EZQL, a natural language to SQL agent for easy data queries.
Commands to automate your workflows.
Dashboard to create graphs to visualize the database, to create graphs we need to use queries.
An SQLite database with 1GB of storage.
Ability to connect an existing Postgres, and MySql database.
It's suitable for developers for simplified database management, product teams for direct data access, and businesses for a comprehensive database view and cost reduction.
What is the tech stack used?
When building an application, it’s important to carefully choose the technologies and tools that will be used in its development. In this section, I will take a closer look at the tech stack used to build Post iT and explore how each technology contributes to the functionality and user experience of the app:
Next.js 13.4.19 /app directory as the React-based framework for building the application
Outerbase Commands to do CRUD operations in the application.
Clerk for authentication.
TypeScript for adding static typing to JavaScript.
Tailwind CSS as the utility-first CSS framework for styling the application.
A Postgres database from Supabase.
Radix UI (shadcn/ui) for components.
Lucide React for adding SVG icons
Next Themes for adding light and dark mode support
Hashnode for providing this opportunity and platform to share and write great articles.
Zod for client-side validation
Cohere ReRank for Semantic search
OpenAI to answer questions based on the data they have added to the application
Resend to send an email to the application creator when someone add's a book.
Note: I have tried to use Outerbase to the extent that it is currently possible based on my understanding. I have not custom-trained the AI model, so it may not provide a completely accurate answer.
Did I face any challenges while building the app?
Embarking on the journey of building an app is always an adventure filled with challenges and rewards. As I was creating Summize for the Outerbase X Hashnode Hackathon, I encountered numerous obstacles that tested my abilities and spurred me to expand my knowledge and skills as a developer.
From mastering the use of Outerbase by creating Commands and Queries, each step presented its own unique hurdles.
Yet, with unwavering determination and steadfast perseverance, I triumphed over these challenges and crafted an application of which I am immensely proud. Before this project, I had no experience with Outerbase, but the thrill of learning how to incorporate it was exhilarating.
The knowledge I gained has left me confident in my ability to utilize Outerbase in future projects, particularly because of how easy it is to use and how great their support is. Great job Brayden, Steve, and Brandon without the support from you all I would not have completed this application.
There were a few problems from the other side, but the team took swift action after reporting the issues and subsequently fixed them.
Despite the challenges, this experience served as a valuable learning opportunity and ultimately contributed to the successful completion of my application.
Also, throughout taking part in this hackathon, I have published some articles. Those articles were published to improve my understanding of Outerbase functionality and help others who might be stuck in a similar place as I was.
The list of articles is as follows:
A dummy's guide to Outerbase: Article explaining the steps to connect a Postgres database and then create queries and commands.
Connecting the Dots: Creating a plugin in Outerbase: The article is about creating a custom plugin that handles drag/drop events to trigger an upload to Cloudinary and then updating the database.
Creating an application with Outerbase: The article covers the process of creating a simple application with CRUD functionality with Next.js, clerk, and Outerbase using their SQLite DB.
Integrating Notion with Outerbase: The article covers the process of creating a command to integrate Notion and calling that command to display info in the front end.
Amalgam: A blend between Outerbase, Pinecone and OpenAI: The article covers how to create an Outerbase Command to integrate Pinecone and OpenAI embedding endpoint.
Use of Outerbase
In this application, I have used Outerbase for multiple reasons as follows:
Commands to communicate with the connected Postgres database
Command with Resend and Discord Integration.
So when a user sends a "Change Image Request" for a book he/she/they uploaded, I get a message in my discord server like the following: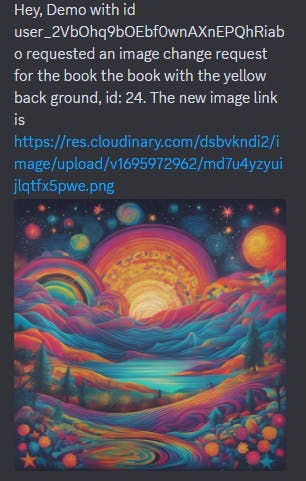
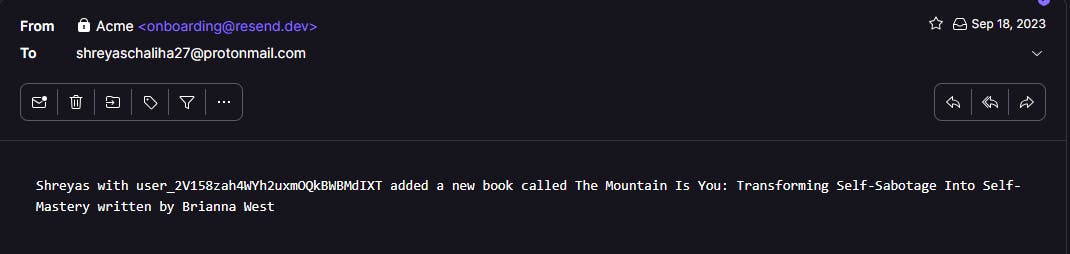
When a user adds a book I get an email like the following:
Outerbase Dashboard to vizualize my data.


EZQL helped me to generate queries to create the dashboard and also has helped me to create some commands where I have used SQL queries.
Creating Summize
The section will cover the steps I took to create the application.
Step 1: Creating a Base
To create a base, I connected my Postgres database from Supabase to Outerbase.
I went to Outerbase's website and logged in.
Got redirected to the dashboard
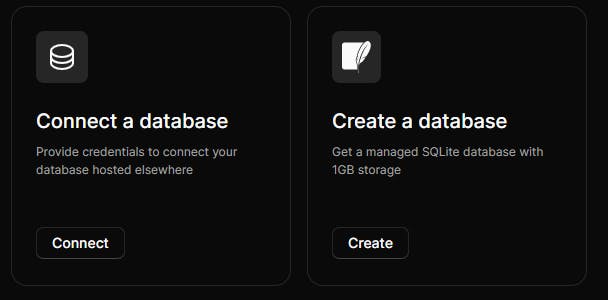
I clicked on "Connect a database"
Choose Postgres as the database type and click on Continue.

Since my Postgres database is from Supabase, I will be using the connecting string so that everything gets auto-filled.

Make sure you click on the Test Connection, and the button should turn green. Then click on Create Base.
Your base should now be created.
Verifying that the connection has been successful
My database has the following tables. Book, Feedback, RequestForm, and Summary.
- I went to table view, and my tables were available there.
Creating Outerbase Command
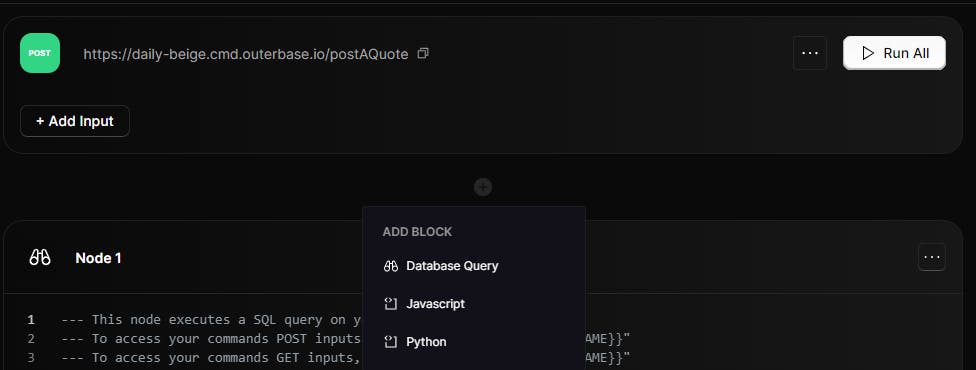
In this section, I will go through the steps I took to create the Command that gets called when a user Adds a book. It is a POST command.
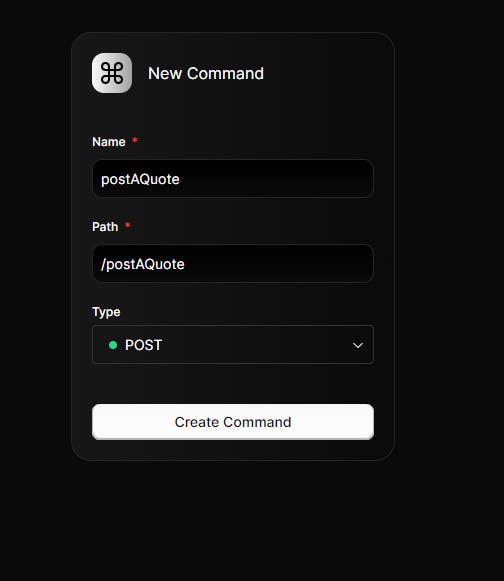
Click on the "+ New Icon" and click on "Commands"
A form will appear. Fill in the values with your desired name and Choose Post.
Click on "+" below the box and Click on "Database Query."
I used the following query based on the columns of my table.
INSERT INTO "public"."Book" (name, description, user_id, src, author, user_name)
VALUES ('{{request.body.name}}', '{{request.body.description}}',
 '{{request.body.user_id}}', '{{request.body.src}}'
Click on Save.
The command was successfully created.
In the section "List of all the Commands" I have added the code for all the Commands including the method type and where it has been used in this application.
Magic of Outerbase: Integrating Resend in the same command
Initially, my command contained only the parts I mentioned above, but over time, as I explored Outerbase more, I realized how much out-of-the-world experience it provides.
So I tried to integrate Resend to send me an email when someone adds a new book or a user sends a request to change the cover image of a book they have published.
(Ideally, that user should get an email too but due to a limitation, that is not possible with my current resend plan.)
Integrating Resend with the Post Command:
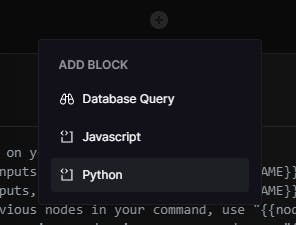
Click on the "+" to add a Javascript block
My Node contains the following code:
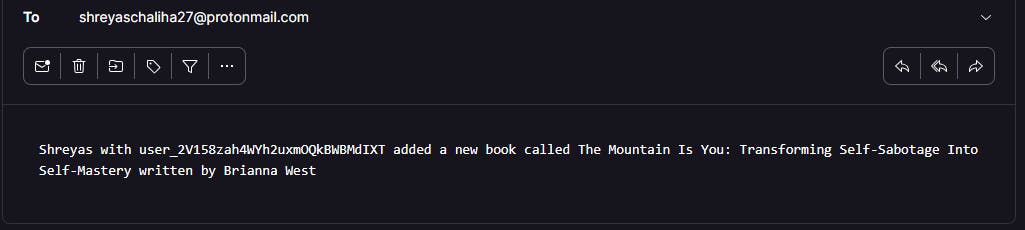
 async function userCode() {
   const user_id = {{request.body.user_id}}
   const user_name = {{request.body.user_name}}
   const author = {{request.body.author}}
   const name = {{request.body.name}}
       const bookMessage = await fetch('https://api.resend.com/emails', {
       method:"POST",
       headers: {
         'Authorization': 'Bearer RESEND_KEY',
         'Content-Type': 'application/json'
       },
       body: JSON.stringify({
         "from": "Book Submission <onboarding@resend.dev>",
         "to": ["EMAIL_ID_TO_SEND_MESSAGE"],
         "subject": "Someone added a new book",
         "text": `${user_name} with ${user_id} added a new book called ${name} written by ${author}`,
         "headers": {
           "X-Entity-Ref-ID": "123"
         }
       })
     });
   return bookMessage;
 }
After a user adds a book, I get an email similar to this:
That is how I integrated Resend with an Outerbase Command.
Verification: To verify that the POST request was successfully implemented, you can check the table to see if the new data got added.
Communicating from the front end:
I am using Next.js as my front-end framework, so I have used react-hook-form to create the form to let the user add a book, and I have also used Zod for client-side validation. You can check the code here.
In the article titled, Creating an application with Outerbase I have a longer explanation of what happens inside the onSubmit function. A very similar thing happens here too.
But in summary, once the user clicks submit after filling in all the values, it makes a call to the command endpoint, and then the information submitted by the user gets added to the database. Since my command has email integration, when this command gets called, I get an email too.
I took a similar approach to creating the other commands I have implemented in my application.
Below in the section "List of all the Commands" I have added the code for every command that I have in this application.
Semantic Search with AI
Semantic Search: Semantic search refers to search techniques that go beyond just matching keywords and take into account the overall meaning and context of phrases and documents. It aims to understand the intent behind queries and content to provide more relevant results.
For this application, I have used Semantic search using Cohere's ReRank API to let users search for books. For the semantic search, I have integrated the data from the /getAllBooks command.
The whole code for the search sheet can be found here.
Understanding the onSubmit function
The code below is the code for the onSubmit function when the user searches for something.
 const onSubmit: SubmitHandler<PromptFormValues> = async (values) => {
    try {
      const books = await fetch(
        `https://middle-indigo.cmd.outerbase.io/getAllBooks`,
        {
          method: "GET",
          headers: {
            "content-type": "application/json",
          },
          cache: "no-cache",
        }
      );
      const data = await books.json();
      const documentsArray = data.response.items.map((item: any) => {
        return {
          text: item.description,
          id: item.id,
          name: item.name,
        };
      });
      values.documents = documentsArray;
      const response = await axios.post("/api/search", {
        values, // Use the converted tokens array
      });
      setResults((current) => [...current, response.data]);
      toast({
        title: "Success",
        description: "Click to visit the page",
        variant: "default",
      });
      form.reset();
    } catch (error) {
      toast({
        title: "Error!",
        description: "Request could not be completed.",
        variant: "destructive",
      });
    }
  };
Here is a detailed explanation of what happens when the user clicks the search button:
The onSubmit handler from useForm is triggered.
The current values from the form state are passed into onSubmit as the values argument.
The book data is fetched from the API endpoint:
const books = await fetch('/getAllBooks');
const data = await books.json();
- The book descriptions are extracted into a documents array:
const documentsArray = data.response.items.map(item => {
  return {
    text: item.description,
    id: item.id,
    name: item.name
  };
});
- This documents array is assigned to the values object:
values.documents = documentsArray;
- A POST request is made to the /api/search endpoint, passing the values:
const response = await axios.post('/api/search', {values});
- The API endpoint handles contacting the Cohere API:
Extracts the query, documents, model, etc. from the values
Makes a call to Cohere's ReRank API
Passes the query, documents, and parameters
Cohere analyzes the documents and reranks them by relevance to the query
The API endpoint returns the Cohere response.
The re-ranked results array is added to the React state:
setResults(current => [...current, response.data]);
- This triggers a re-render, showing the new results.
So in summary, on submission, it fetches data, extracts documents, sends to the API, gets back ranked results from Cohere, and displays them - implementing semantic search!
Verification: Once you type something on the search bar based on the AI's understanding of the book's description, results should be visible.
The following were the results for me when I typed "self-help"

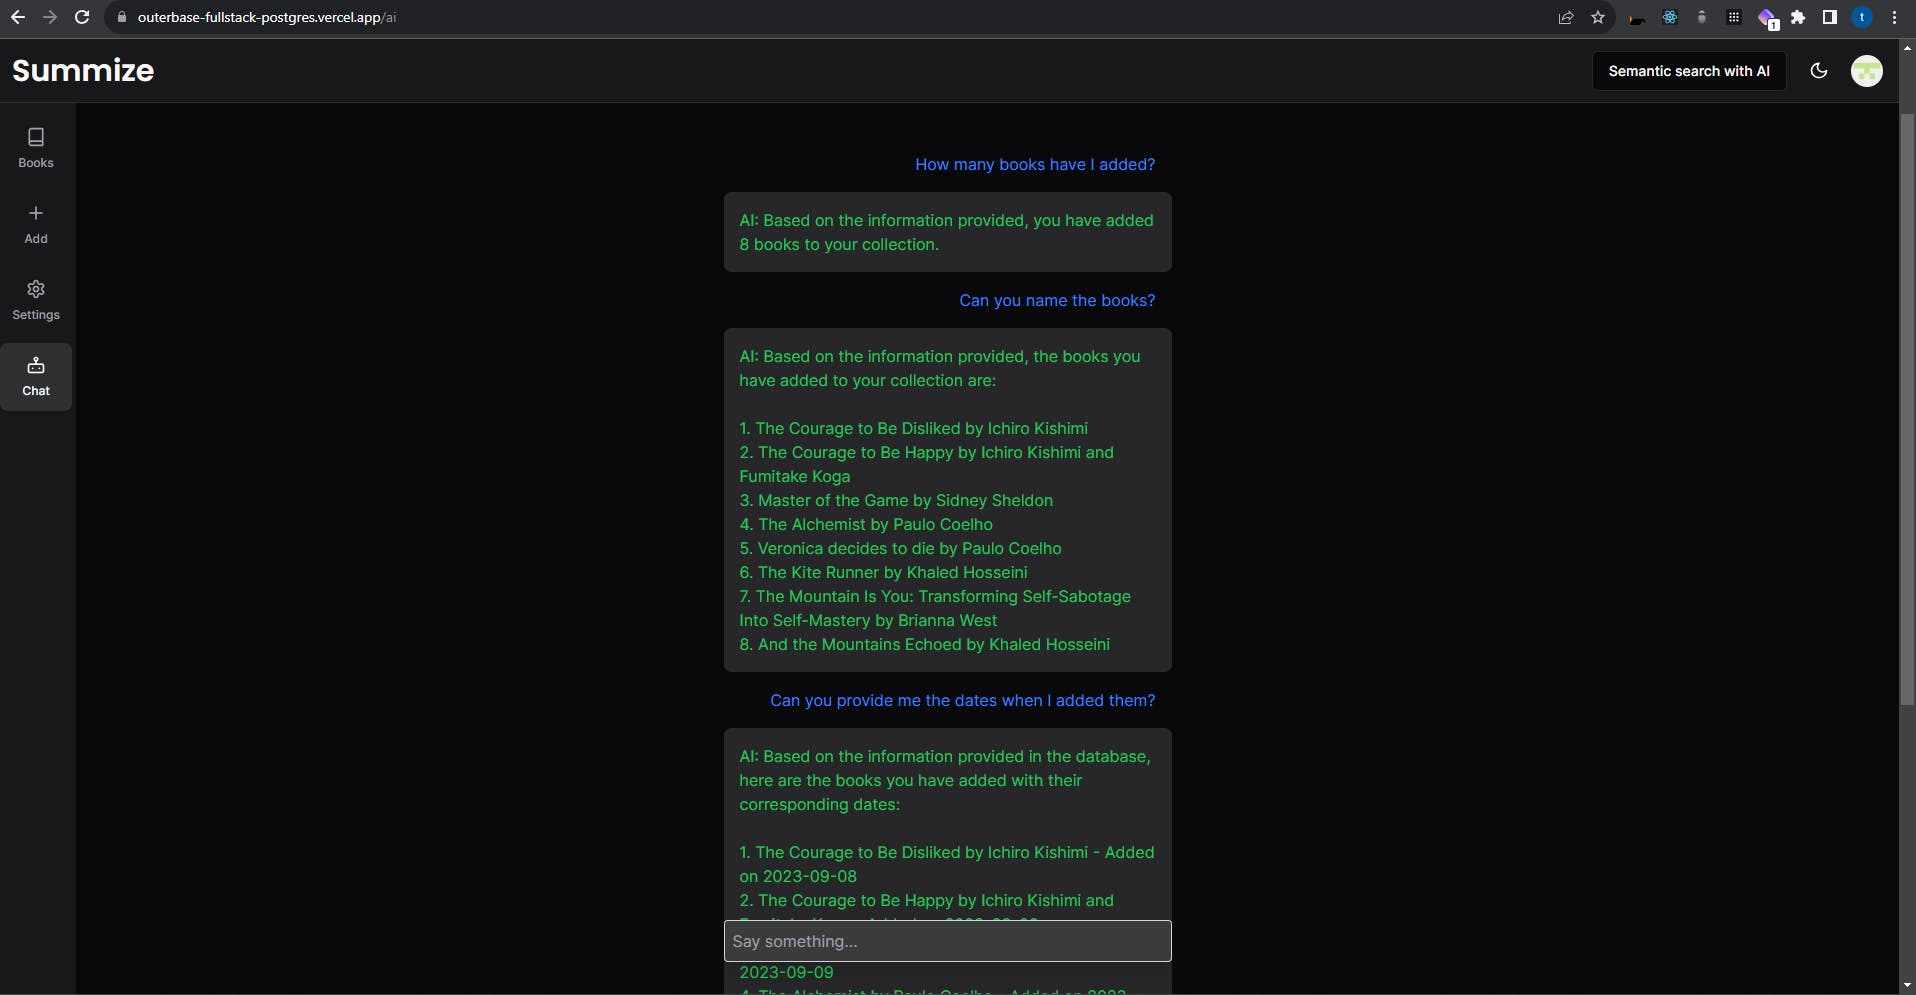
Chatting with your data with AI
Once you are logged in you should see a "Chat" option on the sidebar. If you click on it it will take you to the '/ai' route where you can talk with the data you uploaded. For that, the AI model in use is gpt-3.5-turbo from OpenAI.
Note: It has a very limited amount of funds in it, so at the time you try the deployed application, it may not be working. Also, since it is not a custom-trained model, the results might not be as precise as you might expect.
Below are some screenshots from it; For reference, I have added 8 books from this account.

For this chatbot, I have used OpenAI SDK version 4.2.0 and also used Vercel ai SDK because of its easy-to-use nature.
A brief on the code:
Gets the authenticated user's ID from Clerk
Makes requests to a backend API to get:
The data for bookByUserId, reviewsByUserId, and allBooks is being fetched using Outerbase commands.
The books added by the user
The summaries submitted by the user
All books in the database
Formats the book and summary details into strings to pass to the AI
Constructs the conversation
messagesarray to seed the AI with context about the user's books and summariesCalls the OpenAI chat completions API with the messages and the stream flag enabled
Returns the API response as a streaming text response.
Note: Currently, this feature may not be working in my deployed link due to a lack of credit in my OpenAI account. To use it, you can clone my repo and try it with your own OpenAI key. Sorry for the inconvenience. In the coming days, if I can successfully add funds to my account, the feature will start working again. My deployed link has been set up with my OpenAI key. (According to my bank, it takes some time to get a new card delivered by mail; my old card expired.)
Settings Route
In the settings route, a user can view their data.
If you go that route, you should be greeted like this:

Here you can click on the tabs to see the books you have added and also the Summaries/reviews you have published.
There is a problem I faced while creating this application. Since my table for summaries only includes book_id associated with the summary initially on the summary/review card that book_id was being displayed I found that to be not user-friendly since it is just not possible for me to remember every book ID so to solve that issue I made a GET request with the book_id using the Outerbase Command I created to get the book name and finally display that.

Stripe integration
In the end, I tried to do stripe integration, and it was semi-successful based on my expectations. I could create some commands, but I had to use hard-coded values to make it work, so it was not working for every use case. The Commands integration which I could successfully create are:
Retrieve a customer's payment method based on its Stripe customer ID.
Cancel a subscription.
Create a webhook.
Delete a webhook.
Create a session.
The code for all this is provided in the section below called "Outerbase Stripe Command Integration". Also, I have provided video proof of all those commands working for me, which can be found in the "Demo Video Links" section.
Just a basic overview of how the Stripe functionality is working:
When the user goes to the '/payment' route, he/she/they can see if they are in the free plan or pro plan.
If the user chooses to upgrade by clicking on the button "Upgrade to Pro". The 'api/stripe' route gets hit.
On that route the following things are happening:
It first authenticates the user using the auth() function and retrieves the current user’s information using the currentUser() function.
If the user is not authenticated, it returns a 401 Unauthorized status.
It then sends a GET request to an Outerbase Command endpoint to find the Stripe subscription associated with the current user.
If the user has a valid subscription, it creates a Stripe billing portal session and returns the session URL.
If the user does not have a subscription, it sends a POST request to an Outerbase Command endpoint to create a Stripe session and returns the session URL.
If there are any errors during this process, it logs the error and returns a 500 Internal Server Error status.
Limitation: As I have mentioned above, I had to hard code to make the stripe integrations work. In this case, for the POST endpoint, which hits an Outerbase Command, I hardcoded the success_url and cancel_url with the deployed link and user_id and customer email with the data associated with the demo account. All the command codes can be found in the section below called "Outerbase Stripe Command Integration". Due to this reason, it works for one specific user as it should. Due to that reason, I am hiding the payment option from the sidebar. But I have added a demo video of it working from the front end, which can be found in "Demo Video Links" or you can visit this link
Previously, I was planning to have a credit system to use the AI features in my application. Once a user has a PRO subscription, he/she/they can ask unlimited questions, but due to having next to nothing on my OpenAI account, the whole feature is just not working. In the coming days, if I can add funds to my account, the feature will start working again. In my deployed link, I have set it up with my OpenAI key.
List of all the Commands
INSERT INTO "public"."Book" (name, description, user_id, src, author, user_name)
VALUES ('{{request.body.name}}', '{{request.body.description}}', '{{request.body.user_id}}', '{{request.body.src}}', '{{request.body.author}}', '{{request.body.user_name}}');
- Get Book by Id. In use
Method: GET
SELECT * FROM "public"."Book" WHERE id = '{{request.query.id}}';
- Add a summary/review of a book. In use
Method: POST
INSERT INTO "public"."Summary" (content, user_id, book_id, title, user_name, rating)
VALUES ('{{request.body.content}}', '{{request.body.user_id}}', '{{request.body.book_id}}'::integer, '{{request.body.title}}', '{{request.body.user_name}}', '{{request.body.rating}}');
- Update a previously posted review/summary. In use
Method: PATCH/PUT
UPDATE "public"."Summary"
SET content = '{{request.body.content}}',
    user_id = '{{request.body.user_id}}',
    book_id = '{{request.body.book_id}}',
    title = '{{request.body.title}}',
    user_name = '{{request.body.user_name}}'
WHERE id = '{{request.body.id}}'::integer;
- Delete a summary/review by it's id. In use
Method: DELETE
DELETE FROM "public"."Summary"
WHERE id = '{{request.body.id}}';
- Get Summary by book id. In use
Method: GET
SELECT * FROM "public"."Summary" WHERE book_id = '{{request.query.book_id}}';
- Get Average rating of a book based on reviews/summaries. In use
Method: GET
SELECT AVG(rating) FROM "public"."Summary" WHERE book_id = '{{request.query.book_id}}';
- Get Books by User Id. In use
Method: GET
SELECT * FROM "public"."Book" WHERE user_id = '{{request.query.user_id}}';
- Get Summaries by User Id. In use
Method: GET
SELECT * FROM "public"."Summary" WHERE user_id = '{{request.query.user_id}}';
Outerbase Discord Command Integration
- Command to send a message to my discord server (Outerbase Discord Command Integration). In Use
Method: POST
async function sendMessageToMyDiscordServer() {
    const user_name ={{request.body.user_name}}
    const book_name = {{request.body.book_name}}
    const book_id = {{request.body.book_id}}
     const user_id = {{request.body.user_id}}
     const change_image = {{request.body.change_image}}
    const data = {
        "content": `Hey, ${user_name} with id ${user_id} requested an image change request for the book ${book_name}, id: ${book_id}. The new image link is ${change_image}`,
        "username": 'Image_Request'
    };
    const headers = {
        'Content-Type': 'application/json'
    };
    try {
        await fetch('DISCORD_SERVER_WEKBOOK', {
            method: 'POST',
            headers: headers,
            body: JSON.stringify(data)
        });
        return "OK";
    } catch (error) {
        console.error(error);
        return "Error";
    }
}
Outerbase Resend Command Integration
- Resend Integration (Outerbase Resend Command Integration). In Use Being used as Node 2 on PublishABook Command
Method: POST
async function sendMailwithResend() {
  const user_id = {{request.body.user_id}}
  const user_name = {{request.body.user_name}}
  const author = {{request.body.author}}
  const name = {{request.body.name}}
      const bookMessage = await fetch('https://api.resend.com/emails', {
      method:"POST",
      headers: {
        'Authorization': 'Bearer RESEND_KEY',
        'Content-Type': 'application/json'
      },
      body: JSON.stringify({
        "from": "Book Submission <onboarding@resend.dev>",
        "to": ["EMAIL_ID_TO_SEND_MESSAGE"],
        "subject": "Someone added a new book",
        "text": `${user_name} with ${user_id} added a new book called ${name} written by ${author}`,
        "headers": {
          "X-Entity-Ref-ID": "123"
        }
      })
    });
  return bookMessage;
}
Outerbase Stripe Command Integration
Note: These commands work but just with hardcoded IDs. For proof of these following commands working, check the links mentioned in the section "Demo Video Links". I tried to make it dynamic but was not successful; I always came across some errors. Since it is almost due time I won't be working on these commands anymore for now. Will work on it in like a month or so.
- Command to Cancel a Stripe Subscription
Method: DELETE
async function cancelSubscription() {
    try {
        const sub_to_cancel = await fetch(`https://api.stripe.com/v1/subscriptions/STRIPE_SUBSCRIPTION_ID`, {
            method: "DELETE",
            headers: {
                'Authorization': 'Bearer STRIPE_API_KEY',
            },
        })
        return sub_to_cancel.json()
    } catch (error) {
        console.error(error);
    }
}
- Command to get Payment methods of a Customer
Method: GET
async function getCustomersPaymentMethods() {
    try {
        const payment_methods = await fetch(`https://api.stripe.com/v1/customers/STRIPE_CUSTOMER_ID/payment_methods`, {
            method: "GET",
            headers: {
                'Authorization': 'Bearer STRIPE_API_KEY',
            },
        })
        const data = await payment_methods.json()
        return data
    } catch (error) {
        console.error(error);
    }
}
- Create User Subscription on Database Table. In use
Method: POST
INSERT INTO "public"."UserSubscription" (stripe_current_period_end, stripe_price_id, stripe_subscription_id, stripe_customer_id, user_id)
VALUES ('{{request.body.stripe_current_period_end}}', '{{request.body.stripe_price_id}}', '{{request.body.stripe_subscription_id}}',
'{{request.body.stripe_customer_id}}', '{{request.body.user_id}}');
- Update User subscription. In use
Method: PUT
UPDATE "public"."UserSubscription"
SET
  "stripe_price_id" = '{{request.body.stripe_price_id}}',
  "stripe_current_period_end" = '{{request.body.stripe_current_period_end}}'
WHERE
  "stripe_subscription_id" = '{{request.body.stripe_subscription_id}}';
- Find a Stripe subscription. In use
Method: GET
SELECT * FROM "public"."UserSubscription" WHERE user_id = '{{request.query.userId}}';
Command to create a stripe webhook. (Not required to be use in code base since it is a one time thing)
Method: POSTasync function createWebhook() { const body = `url=${encodeURIComponent('URL_FOR_WEBHOOK_ENDPOINT)}&enabled_events[]=checkout.session.completed&enabled_events[]=invoice.payment_succeeded`; try { const response = await fetch('https://api.stripe.com/v1/webhook_endpoints', { method: 'POST', headers: { 'Authorization': 'Bearer YOUR_STRIPE_API_KEY', }, body }); if(!response.ok) { throw new Error('Request failed'); } const data = await response.json(); console.log(data); return data; } catch (error) { console.error(error); } }
- Command to delete a webhook
Method: DELETE
- Command to delete a webhook
async function deleteWebhook() {
    try {
        const webhook_to_delete = await fetch(`https://api.stripe.com/v1/webhook_endpoints/WEBHOOK_ID_TO_DELETE`, {
            method: "DELETE",
            headers: {
                'Authorization': 'Bearer YOUR_STRIPE_API_KEY',
            },
        })
        return webhook_to_delete.json()
    } catch (error) {
        console.error(error);
    }
}

- Command to create a stripe session. Example use case
Method: POST
async function createStripeSession() {
  const url = 'https://api.stripe.com/v1/checkout/sessions';
  const body = `success_url=YOUR_SITE_URL&cancel_url=YOUR_SITE_URL&payment_method_types[]=card&mode=subscription&billing_address_collection=auto&customer_email=CUSTOMER_EMAIL&line_items[0][price_data][currency]=USD&line_items[0][price_data][product_data][name]=Summize&line_items[0][price_data][product_data][description]=Review%20and%20find%20books%20you%20love&line_items[0][price_data][unit_amount]=1000&line_items[0][price_data][recurring][interval]=month&line_items[0][quantity]=1&metadata[userId]=USER_ID`;
  try {
    const response = await fetch(url, {
      method: 'POST',
      headers: {
        'Authorization': 'Bearer STRIPE_API_KEY'
      },
      body
    });
    if(!response.ok) {
      throw new Error('Request failed');
    }
    const data = await response.json();
    console.log(data);
    return data;
  } catch(error) {
    console.error(error);
  }
}
Queries for Database Analysis
Being able to Analyze my database by creating graphs with the use of SQL queries is one of my favorite features from Outerbase. I also do not enjoy creating graphs and try to avoid them as much as possible so this feature from Outerbase is just a life saver for me. For creating these queries another Outerbase feature called EQZL has been of great help.
Title: Number of Books Added by date

SELECT DATE("createdAt") AS "date", COUNT(*) AS "book_count" FROM "public"."Book" GROUP BY DATE("createdAt") ORDER BY "date" ASC
Title: Most books uploaded by user name

SELECT "user_name", COUNT(*) AS "book_count"
FROM "public"."Book"
GROUP BY "user_name"
ORDER BY "book_count" DESC;
Title: Top 3 books with most reviews/summaries

SELECT b."name", s."book_id", s."summary_count"
FROM (
  SELECT "book_id", COUNT(*) AS "summary_count"
  FROM "Summary"
  GROUP BY "book_id"
  ORDER BY "summary_count" DESC
  LIMIT 3
) AS s
JOIN "Book" AS b
ON s."book_id" = b."id";
Title: Total Books

SELECT COUNT(*)
FROM "public"."Book";
Title: Total Summaries

SELECT COUNT(*)
FROM "public"."Summary";
A brief on styling and responsiveness of the application
In the application, I have used tailwind css to do all the styling. I have tried to make the application as responsive as possible. But there may be some parts that I might have missed.
I also used custom fonts from FontShare for the application, the names of the font families are Satoshi and Ranade.
The application also features Light and Dark mode which has been utilized with the use of the class strategy using next-themes.
Background
Light mode: I have used a shade of white [hsl(0 0 89.8%)] as the background color.
Dark mode: I have used a shade of black [hsl(240 10% 3.9%)] as the background color since pure black might cause eye strain to some users.
Home page
For the words "Outerbase" I added an anchor tag to link it to their home page and also so that I can provide custom animation and color.
"bg-gradient-to-r" class applies a gradient effect from yellow-500 to purple-500 and then red-500.
For the transition, I have also used animate-text class, a custom animation. It has been defined in the tailwind.config.js file.
The animation property specifies that the text animation should have a duration of 5 seconds (5s), use an ease timing function, and repeat infinitely (infinite).
The keyframes property defines the keyframes for the text animation. At the beginning (0%) and end (100%) of the animation, the background-size is set to 200% 200% and the background-position is set to left center. At the halfway point (50%) of the animation, the background-size remains the same but the background-position changes to right center.
Public Repo Link
Github Repo: https://github.com/trace2798/outerbase_fullstack_postgres
Current Demo Deployment: Summize (I might un-deploy it in the future so I have provided the demo video.)
Demo Video Links
Youtube Link: https://youtu.be/mJCZH2zumqk
Note: For this stripe integration Commands I had to hardcode the ID numbers. In this deployed application, you may not see anything related to payment, but it does exist if you clone it and run it locally.
Stripe Integration: Check Customer's Payment_methods and Cancel subscription: https://youtu.be/I5nxdjx8424
Stripe Integration: Create and delete webhook: https://youtu.be/s99W8UA4n_0
Stripe Integration: Create a Session from front end: https://youtu.be/-UcM0fZ6g9c
Demo Credentials
Email: demo.testing2798@proton.me
Password: qycv.Tt<vV8DN9?$
I hope this article helps you. If you have any questions, feel free to leave a comment, and I will respond to them as soon as possible.
Happy Hacking !!!